Customizing MarvinSketch GUI
You can personalize the user interface to better suit your needs or style.
For example, you can reorganize the menu bar, you can create, delete or modify toolbars, and many more.
Any changes you make will become your personal default environment, though you can
restore the default settings any time.
Basic Changes
Moving Toolbars
To move a toolbar, drag it by its separator bar, which is located at the left edge of
horizontal toolbars or at the top of vertical toolbars.
(Note, that depending on the Look&Feel you currently use, the separator bar
might be harder to notice and drag.)
While dragging the toolbar, you can see a colored border around it, indicating the
place and direction the toolbar will have if you finish dragging. Depending on the current
Look&Feel the colors of the border are different. For example, using JGoodies SkyBluer Look&Feel theme,
light-blue border means that the toolbar will float, while dark-blue shows that the toolbar will be docked.
If you set a toolbar to be floating, you can dock it back by closing it.
Hide/Show Toolbars
You can change the visibility of toolbars in the View > Toolbars menu.
Hide/Show Menu Bar
To hide the Menubar, choose View > Menubar. To show it, press F11 after clicking on the canvas.
Hide/Show Status Bar
View > Status Bar turns the Status Bar on or off.
Advanced Changes
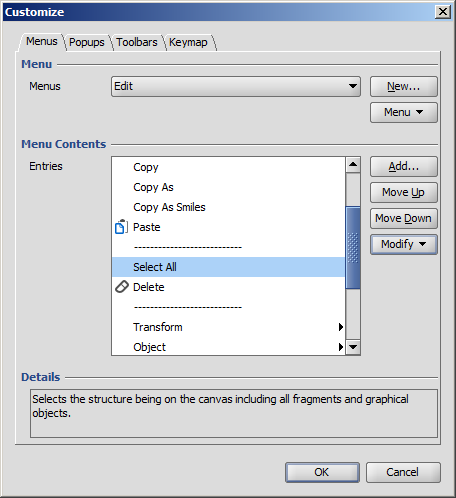
The graphical user interface of MarvinSketch can interactively be personalized using the View > Editor Style > Customize... dialog.
Note that the customization related functions usually do not ask for confirmation
before taking action to make the procedure faster.
The original interface can be restored any time by choosing View > Editor Style > Reset current configuration.

By choosing a menu from the Menus list, the contents of the selected menu will be listed in the Menu Contents.
With selecting a menu entry, its detailed help text will appear in the Details field.
If a black triangle is visible on the right side of a menu entry, it means that this entry is a Submenu.
To list the contents of the submenu, select it from the Menus list.
List of the available Menu commands
| New |
Creates a new menu and places it at the end of the Menu Bar. |
| Menu > Move |
Allows altering the position of main menus. |
| Menu > Rename |
Renaming a menu in an appearing dialog. |
| Menu > Delete |
Removes a menu with all of its contents. |
List of the available Menu Contents commands

| Add |
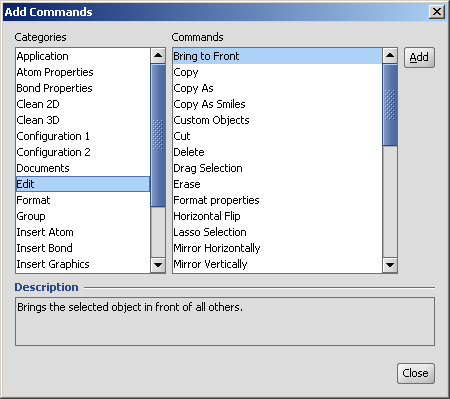
Makes the above Add Commands dialog visible, where you can browse
all available commands of MarvinSketch.
The commands are organized to Categories, and are listed in alphabetical order.
|
| Move Up/Down |
Moves a menu element by one position in the container menu. |
| Modify > Add Submenu |
Adds a new submenu after the currently selected element. |
| Modify > Begin a Group |
Adds a menu separator after the currently selected element. |
| Modify > Rename |
Renames a sumbenu or menu element. You can also change the mnemonics by replacing the & sign in the name. |
| Modify > Delete |
Removes the menu element or submenu. |
Popups
The customization of Pop-up menus are similar to normal menus. However it is not
possible to remove, rename or create a new Pop-up menu, you can only change the contents of the available Pop-up menus.
The reason for this is that these menus are context-sensitive, and their name and
existence are bound to the underlying contexts.

Note, that the Advanced Templates Toolbar is not possible to be customized.
List of the available Toolbar commands
| Use Large Icons |
When checked, all toolbar buttons have 24x24 pixel sized icons, otherwise the 16x16 pixel versions.
By default the large icons are used. |
| New |
Creates a new toolbar and places it north to the first row having some space on the right-hand side. |
| Toolbar > Rename |
Renaming a toolbar in an appearing dialog. |
| Toolbar > Delete |
Removes a toolbar with all of its contents. |
| Toolbar > Icons Only |
The buttons contained by this toolbar will be shown by icon only.
Those commands that does not have a corresponding icon defined will be shown by text in this case too. |
| Toolbar > Text Only |
The buttons contained by this toolbar will be shown by text only. |
| Toolbar > Icons & Text |
Icon and text will also be shown for the buttons contained by this toolbar.
The text is appearing below the icon. |
List of the available Toolbar Contents commands
| Add |
Makes the Add Commands dialog visible, where you can browse
all available commands of MarvinSketch.
The commands are organized to Categories, and are listed in alphabetical order.
|
| Move Up/Down |
Moves a toolbar element by one position in the container toolbar. |
| Modify > Rename |
Renames an element. You can also change the mnemonics by replacing the & sign in the name. |
| Modify > Delete |
Removes the element or separator. |
| Modify > Begin a Group |
Adds a toolbar separator after the currently selected element. |
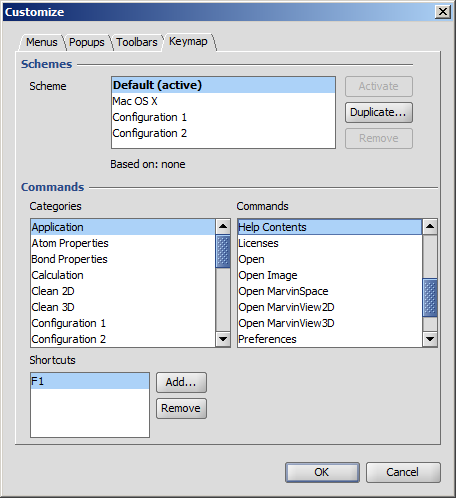
It is possible to define and switch between Keymap Shemes, where all Sheme is a different shortcut-set.
On the Keymap tab, you can browse all available commands of MarvinSketch to define shortcuts
to any of the commands you would like to.

Only one scheme can be active at a time. A scheme can be made active by selecting and pressing the Activate button.
If a scheme is based on another it means that all of the shortcuts are inherited
from the base scheme, though they can be overwritten one-by-one.
Duplicating a scheme will create and activate a new scheme which will be based upon the previously selected one.
Shemes - except the default one - can also be Removed.
Adding shortcuts
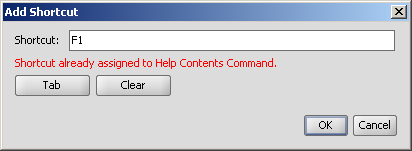
A shortcut can be added by focusing the Shortcut field, and pressing the desired shortcut combination, for example F1.
If the shortcut already exists, a warning message appears, and shows which command has the activated shortcut.

The Tab button is required if you would like to use the Tab key for a shortcut,
because if you press Tab in the Shortcut field, it will loose the focus instead of defining the shortcut.
The Clear button helps you to remove the shortcut from the field, because pressing the
Backspace button defines a new shortcut instead of removing it.
This document described the interactive way of customizing the user interface using the user interface itself.
Another way of personalization is shown in the Configurations document.
The same method can be used on server side as well.
There are a few elements which are not part of the default configuration of MarvinSketch but you can add it via the customization dialog. These are:
- Lone Pair Group
The toolbar and the menu can be customized to contain the "Lone Pair Group" tool. You have to disable "Automatic Lone Pair" calculation (Preferences dialog, Structure tab) to be able to set the lone pairs manually. Then choose View > Customize..., Menu or Toolbars tab. The Lone Pair Group can be added in the menu contents section. Choose Tools from the Toolbars list, then click Add at the Toolbar contents section. Choose Lone Pair Group from the Insert Lone Pair category, click Add then click Close. The Lone Pair Group tool is now visible on the toolbar on the left of the canvas.
- Radical Group
You can add the "Radical Group" toolbar to your MarvinSketch configuration. This group contains a "Radical switch" button, a "Monovalent radical" button and a "Radical off" button.
- Free Radical Group
 You can add the "Free Radical Group" to your MarvinSketch configuration. This group contains a
  "0 radical",
  "1 radical",
  "2 radicals",
  "3 radicals",
  "4 radicals" and "Increase Radical" buttons. The last one increases the number of radical electrons on the atom by one. In case the number of radicals on the atom is 4, it will be set to zero instead of increasing.
- Manual Atom Map
 "Manual Atom Map" can be added from "Structure" category. Selecting the "Manual Atom Map" tool, hold down the left mouse button on an atom of the first molecule, then drag it to the corresponding atom of the second molecule. The same map number will be added to both atoms.
- Manual Atom Map-Unmap Group
A group containing actions: "Manual Atom Map" and "Unmap Atoms".
- Reaxys Generics
 "Reaxys generics" can be added from the "Insert Template" category. This template library contains the generic abbreviation commonly used in the Reaxys database.
- Substitution Count
Extension of the menu with the "Substitution Count": create a new entry recommendably in the "Atom" menu. Select the new submenu in the Menus dropdown list. Select the new entry and click Add.. Choose the commands from Atom Properties category (Substitution Count off, Substitution Count as Drawn, 0 substituent, 1 substituent, etc.), click Add, then click Close.
- Switch Transformation
Create this new entry preferably in the "Edit > Transform" submenu: select "Edit | Transform" from the Menus dropdown list, select "Switch Transformation" from the entries list and click Add. Select the "Edit" category and the "Switch Transformation" from the commands list and click Add, then click Close and OK to close the popup windows.
This command will change the transformation mode from Drag to Rotate in 2D, Rotate in 2D to Rotate in 3D, and Rotate in 3D to Drag.
- Graph Invariants
Create this new entry preferably in the "View > Advanced" submenu: select "View | Advanced" from the Menus dropdown list, select "Graph Invariants" from the entries list and click Add. Select the "Advanced" category and the "Switch Transformation" from the commands list and click Add, then click Close and OK to close the popup windows.
This command will toggle to display the graph invariants (canonical labels).
The default Look&Feel (skin) can be changed by editing the marvin.properties file (in the user's home/chemaxon directory) and inserting/changing the "skin=..." line to the following:
- Metal Look&Feel
skin=javax.swing.plaf.metal.MetalLookAndFeel
- Nimbus Look&Feel
skin=com.sun.java.swing.plaf.nimbus.NimbusLookAndFeel
- CDE/Motif Look&Feel
skin=com.sun.java.swing.plaf.motif.MotifLookAndFeel
- Windows Look&Feel
(Default on Windows, can be deleted)
skin=com.sun.java.swing.plaf.windows.WindowsLookAndFeel
- Windows Classic Look&Feel
skin=com.sun.java.swing.plaf.windows.WindowsClassicLookAndFeel
- Jgoodies Plastic XP Look&Feel
skin=com.jgoodies.looks.plastic.PlasticXPLookAndFeel
- Jgoodies Plastic Look&Feel
skin=com.jgoodies.looks.plastic.PlasticLookAndFeel


